It is faster than the previous versions of Windows includingThesta and XP in terms of boot up time and installation.
Also, the graphical user interface was upgraded in Windows 7.
Windows 7 comes with the windows defender which provides the best protection to the system.
It is probably safe from hackers and is much safer than the previous operating systems launched by Microsoft.
Lastly, programs such as Wordpad, MS office and paint have been improved.
Disadvantages of Installing Windows 7
The first disadvantage of installing Windows 7 is that it needs a minimum RAM capacity of at least 1 GB.
The second drawback is that Windows XP user finds this OS difficult to use so they switch back to XP.
Many users of Windows 7 have encountered a problem of BSOD.
Lastly, from boot up time to launching any application Windows 10 is faster than Windows 7.
About Lenovo Yoga 920
Lenovo Yoga 920 is the flagship laptop by Lenovo. It is one of the best 2-in -1 laptop available in the market. Lenovo Yoga 920 is one of the premium product available in the market with a high price tag.
Pros of purchasing Lenovo Yoga 920
Thin
A lovely design
Sound quality is great
Cons of purchasing Lenovo Yoga 920
Keyboards are not sound
It lacks the graphical power
Specifications
Lenovo Yoga 920 comes with a 1.8GHz Intel Core i7-855OU CPU
Change boot-order to boot from USB in Lenovo Yoga 920
Turn your Lenovo Yoga 920 off
Now connect the bootable USB stick to the port.
Hold the volume-down button and Press and release the power button.
Release the volume down button as soon as the Lenovo logo appears.
Now go to the Boot configuration option and move USB to the top of the list.
Finally, Reboot your Laptop
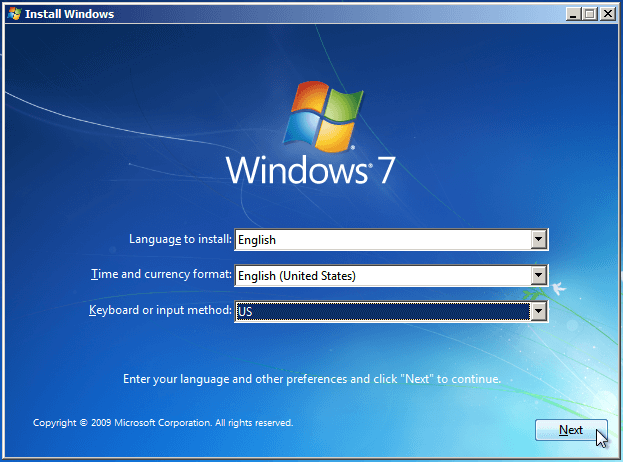
So after we have created a bootable Windows 7 USB and changed the boot order to USB, you need to press any key on the keyboard to proceed.
Now you can select the language to install, Time and currency and Keyboard and input method.
Click Next
Now, select install Now
Read and Accept the Windows 7 License and Terms
Next, there are two options available to install Windows Upgrade and Custom (advanced) select “Custom (advanced)”.
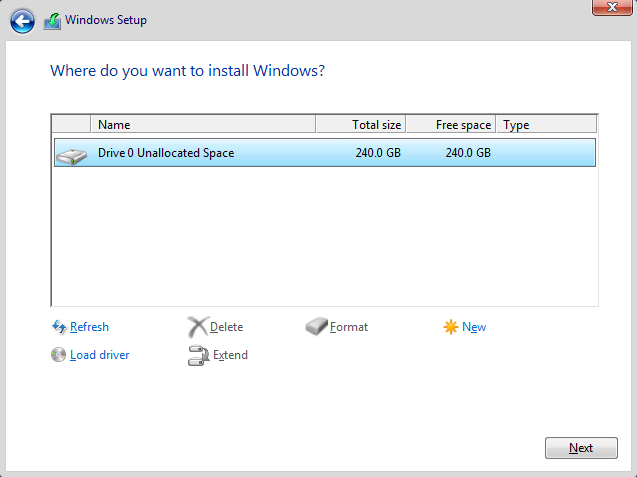
2. Decide where to install Windows 7
A Hard drive is also known as a disk drive which stores data on your computer and partitions divide this storage into parts.
You just need to select the disk on a new PC which should be characterized as Unallocated Space.
If the drives have data on it you should delete the data or format it by selecting the drives from the list and click on Drive options (advanced) and then Format from the options.
Create a partition if your computer doesn’t have any partitions yet
Now, From the list of hard drives select one and click on the Drive options (advanced).
Select “New” from Drive options and select the size, and click “OK” (Remember 1GB = 1024MB)
Once you have selected your preferred hard drive to select it from the list and click Next.
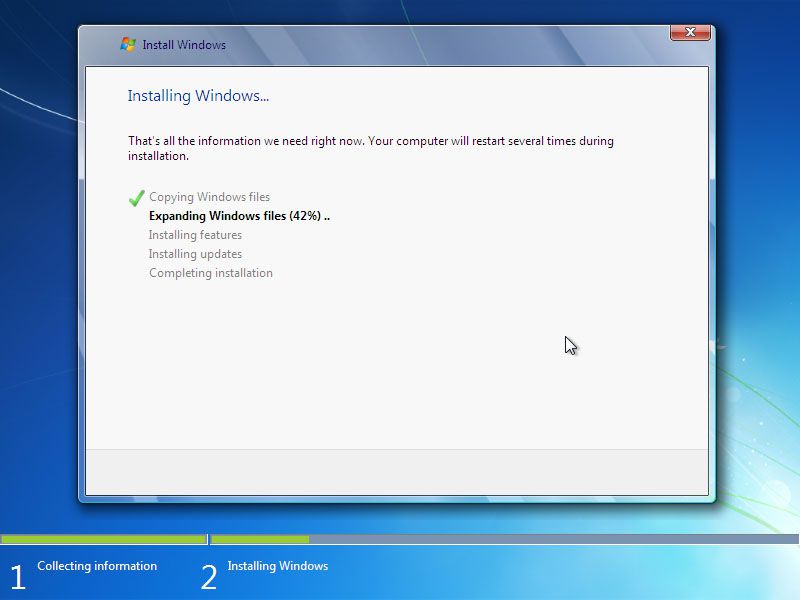
Finally, Installation of Windows 7 on your Lenovo Yoga 920 will begin.
Wait for a few minutes and you will get all new operating system installed in your Laptop.


")
")