How to install Windows 7 on Xiaomi Mi Notebook Air from USB

Here is How to install Windows 7 on Xiaomi Mi Notebook Air with USB? just follow the step-by-step instructions for a successful installation.

About Windows 7

  • Windows 7 is produced by Microsoft as part of the family of Windows operating systems. It was available from October 22, 2009, in the market.
  • The operating system has been praised by critics and is considered as a major improvement over previous models.
  • Windows 7 was a major part of the success of Microsoft and As of 2019, 40% of computers worldwide are using Windows 7.

Advantages of installing Windows 7

  • It is faster than the previous versions of Windows including Vista and XP in terms of boot-up time and installation.
  • Also, the graphical user interface was upgraded in Windows 7.
  • Windows 7 comes with the windows defender which provides the best protection to the system.
  • It is probably safe from hackers and is much safer than the previous operating systems launched by Microsoft.
  • Lastly, programs such as Wordpad, MS office and paint have been improved.

Windows 10 vs Windows 7

  • As of August 2018, there were 40.3% users of Windows 7 and 37.8% of Windows 10.
  • Windows 10 is more secure than Windows 7 with features like UEFI secure boot, Device Guard, and BitLocker.
  • Windows 7 provides better software compatibility than the new Operating system Windows 10.
  • Lastly, users are more familiar to Windows 7 and for old users, it’s not worth spending the time to install a new operating system.

Disadvantages of Installing Windows 7

  • The first disadvantage of installing Windows 7 is that it needs a minimum RAM capacity of at least 1 GB.
  • The second drawback is that the Windows XP user finds this OS difficult to use so they switch back to XP.
  • Many users of Windows 7 have encountered a problem with BSOD.
  • Lastly, from boot-up time to launching any application Windows 10 is faster than Windows 7.

About Xiaomi Mi Notebook Air

  • Xiaomi Mi Notebook Air comes with a 13.3 inches display with a resolution of 1920 x 1080 pixels.
  • It is powered by the Intel Core i5-6200U processor with 8GB of DDR4 RAM and 256GB SSD for storage.
  • The graphics are powered by NVIDIA GeForce 940MX.
  • Xiaomi Mi Notebook Air has a 4 cell battery with a battery life of 9.5hrs.
  • It has network options including 802.11 WIFI, and Bluetooth 4.0.
  • Lastly, Mi Notebook Air is 14.8mm thick and weighs 1.28Kg with Windows 10 Home Edition (64 bits).

Full Specifications

Instructions to install Windows 7 on Xiaomi Mi Notebook Air

The process of installing Windows 7 in Xiaomi Mi Notebook Air is very simple all you need to do is follow some set of instructions and get the result.

Requisite

  • First of all, create a backup of all your files as you may lose all your data.
  • Minimum RAM capacity needed is 1GB
  • Download the Windows 7 ISO file from the official website – https://www.microsoft.com/en-in/software-download/windows7
  • For installing the 64-bit Windows 7 operating system, we need a minimum of 20 GB.

1. Create Bootable USB Drive for installing Windows 7 from USB

Minimum 6GB USB Flash Drive required to install Windows 7

Download Rufus

Creating bootable Windows 7 USB drive with Rufus on Xiaomi Mi Notebook Air

  1. After installing Rufus simply select the ISO file from the file manager and accept all settings when the popup window appears.
  2. Select the MBR partition scheme for BIOS or UEFI  and If your laptop has UEFI bios then select the other two options.
  3. For the Filesystem select NTFS  option and select if your PC has UEFI bios then select FAT32.
  4. The default Cluster size option should be selected.
  5. Make sure all three options including Quick Format, Create a Bootable disk using and Create extended labels and icon files are selected.
  6. Finally, start the process and this software will automatically format and create a bootable USB flash drive.

Read also – Xiaomi Mi Notebook Air Boot from USB for Linux and Windows

Change boot-order to boot from USB in Xiaomi Mi Notebook Air

  • Turn your Xiaomi Mi Notebook Air laptop off
  • To enter into BIOS in Xiaomi Mi Notebook Air as soon as the logo appears click the BIOS Key such as F2 key or any other key provided by the manufacturer.
  • Read the on-screen instructions and change the boot order to USB to Boot from USB from the Boot menu

So after we have created a bootable Windows 7 USB and changed the boot order to USB, you need to press any key on the keyboard to proceed.

Install Windows 7 in Xiaomi Mi Notebook Air

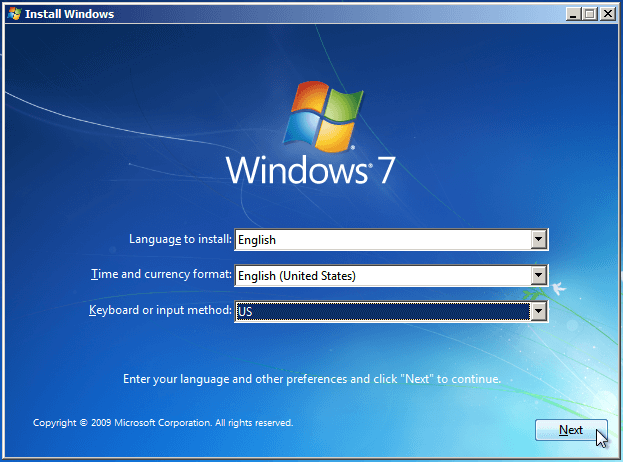
Now you can select the language to install, Time and currency and Keyboard and input method.

Install Windows 7 in Xiaomi Mi Notebook Air

  • Click Next
  • Now, select install Now
  • Read and Accept the Windows 7 License and Terms
  • Next, there are two options available to install Windows Upgrade and Custom (advanced) select “Custom (advanced)”.

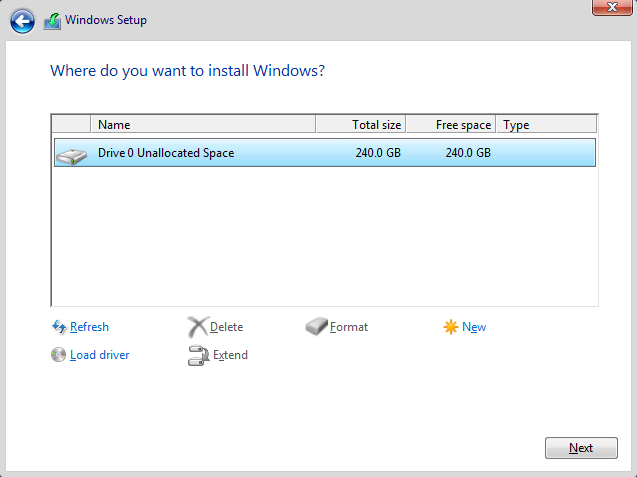
2. Decide where to install Windows 7

How to install Windows 7 in Xiaomi Mi Notebook Air

  • A Hard drive is also known as a disk drive that stores data on your computer and partitions divide this storage into parts.
  • You just need to select the disk on a new PC which should be characterized as Unallocated Space.
  • If the drives have data on it you should delete the data or format it by selecting the drives from the list and click on Drive options (advanced) and then Format from the options.
  • Create a partition if your computer doesn’t have any partitions yet
    • Now, From the list of hard drives select one and click on the Drive options (advanced).
    • Select “New” from Drive options and select the size, and click “OK” (Remember 1GB = 1024MB)
  • Once you have selected your preferred hard drive to select it from the list and click Next.
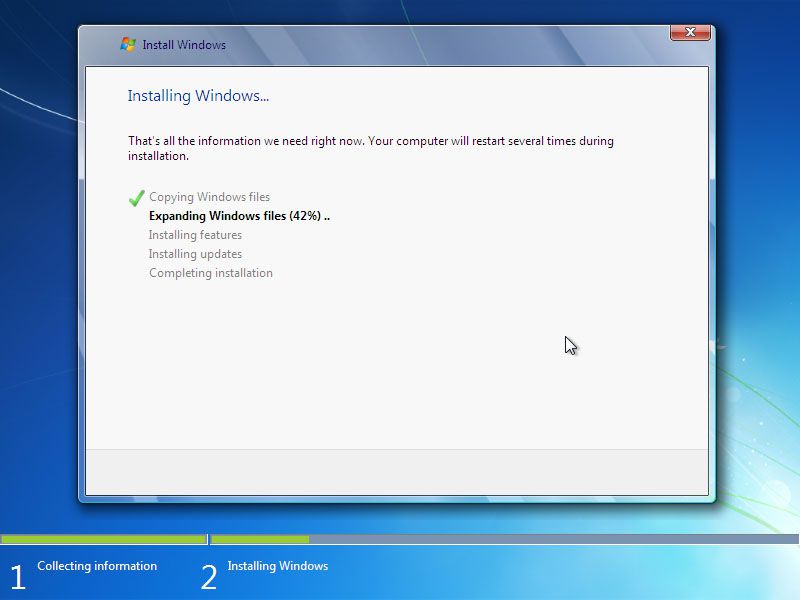
  • Finally, the installation of Windows 7 on your Xiaomi Mi Notebook Air will begin.

Install Windows 7 in Xiaomi Mi Notebook Air

Wait for a few minutes and you will get the all-new operating system installed in your Laptop.

Read also –

Read some installation guides,

If you have any issue or confusion during installation you are free to ask by commenting

Or by  Asking a Question

Leave a Comment

Your email address will not be published. Required fields are marked *

Scroll to Top