Here we have shown six methods to Root your Redmi Note 10 Pro Max. You have to follow the exact same steps to get your smartphone unlocked.
About Redmi Note 10 Pro Max
Redmi Note 10 Pro Max has a fantastic 6.67-inch full-HD+ 120Hz HDR10 Super AMOLED display with an embedded front camera. It’s bright, crisp, and vibrant. You get a Qualcomm Snapdragon 732G SoC and up to 8GB of RAM with 128GB of storage. There’s a 5020mAh battery with a 33W charger in the box.
Rooting an Android device is giving the phone full permission to operate the phone. After rooting the device you can easily install a custom kernel, custom ROM, unlock your phone and remove pre-installed applications.
Before starting the process of rooting, it is important to be aware of some advantages and disadvantages of Android devices.
Advantages of Rooting your Redmi Note 10 Pro Max
Once you root your device there are some amazing things that unlock within your phone. It’s like giving your phone some kind of a superpower to perform anything it desires. There is some kind of desire which made you think of rooting your handset and it must be listed below.
1. Installing Custom ROMs: You can start installing a custom ROM or Kernel. it is the main reason why people try to root their Android smartphones. They are typically more enhanced than our stock ROM or the ROM provided by our phone’s manufacturer. Custom ROMs offer several performance fixes, a good user interface, and several customization tweaks to your system.
2. Ad-block for all apps is now possible: Pop-ups are considered a regular problem in most games and apps, but no one on the stock ROM is taking care of them. It often gets very complicated to stop all kinds of ads on our smartphone whereas on a rooted device it is very easy.
3. Easily install any app: Installing incompatible apps is now possible, root gives access to all the apps you can find. You get several bonuses such as updating the OS before it launches in the market. Also, there are some apps that can’t be uninstalled easily but with root, you can easily uninstall any app on your Redmi Note 10 Pro Max.
4. More battery life and speed: You get more battery life Greenify to close useless applications automatically, effectively improving your device performance. The app needs root permission to unlock so rooting Android helps the smartphone to unlock its full potential.
6. Create full backups: Apps like Titanium will entirely back up your rooted device. The app only works on rooted Android devices.
Disadvantages of Rooting
If you root your Redmi Note 10 Pro Max s, you will lose your Phone Warranty.
You will not be able to receive System Updates from your phone manufacturer. Moreover, you will receive notifications regarding updates of the system, but you won’t be able to do so because have a rooted phone, to update simply unroot again and proceed.
If you miss any steps while rooting, your phone may become Completely Dead or bricked.
You will not be able to install OTA updates on your phone.
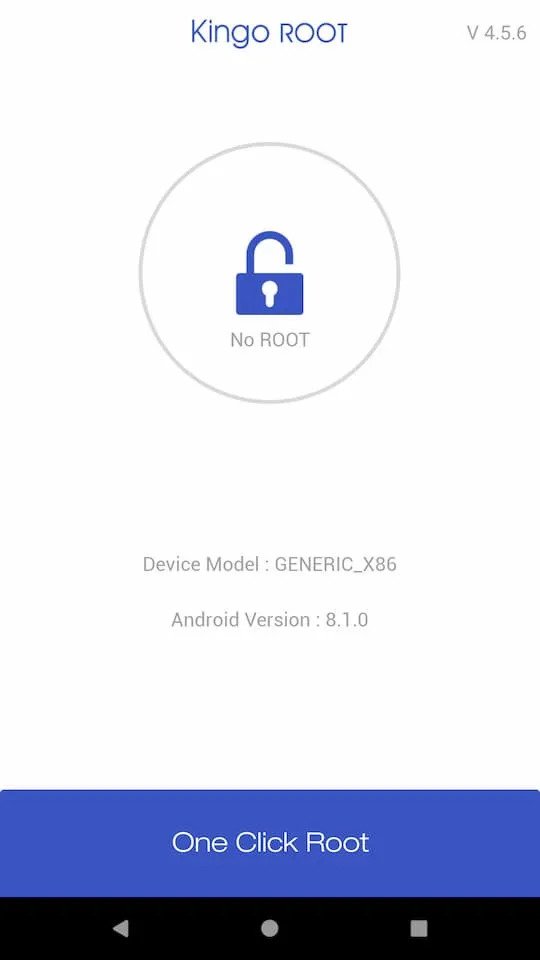
After rooting some smartphones, they start lagging with their User Interface. (mainly after rooting with Kingroot / Kingo root apps)
Pre-Requisite
There is a high risk of been stuck in between the process so make sure your phone is fully charged.
Install a custom recovery like TWRP to flash files. Check this guide
Also, Take Complete Backup of your Android device.
This guide is only for rooting Redmi Note 10 Pro Max devices. Do not try this method on any other smartphone. otherwise, you can lose your device by becoming unstable.
Let’s Root Redmi Note 10 Pro Max
Before we proceed to Root your Redmi Note 10 Pro Max smartphone, you have to fulfill the below Requirements:
Make sure to Unlock the Bootloader On Redmi Note 10 Pro Max. This step is essential; without unlocking you cannot Root your phone.
This method is only for the Redmi Note 10 Pro Max smartphone. Please do not try this method on any other smartphone. Otherwise, it will Brick your phone.
Warning: All the tutorials/ guides shown in this blog are not tested for each and every smartphone. As the Rooting process is almost the same for every smartphone.
Infofuge.com is not responsible for loss and damage to your smartphone. Try these methods with your own risk!
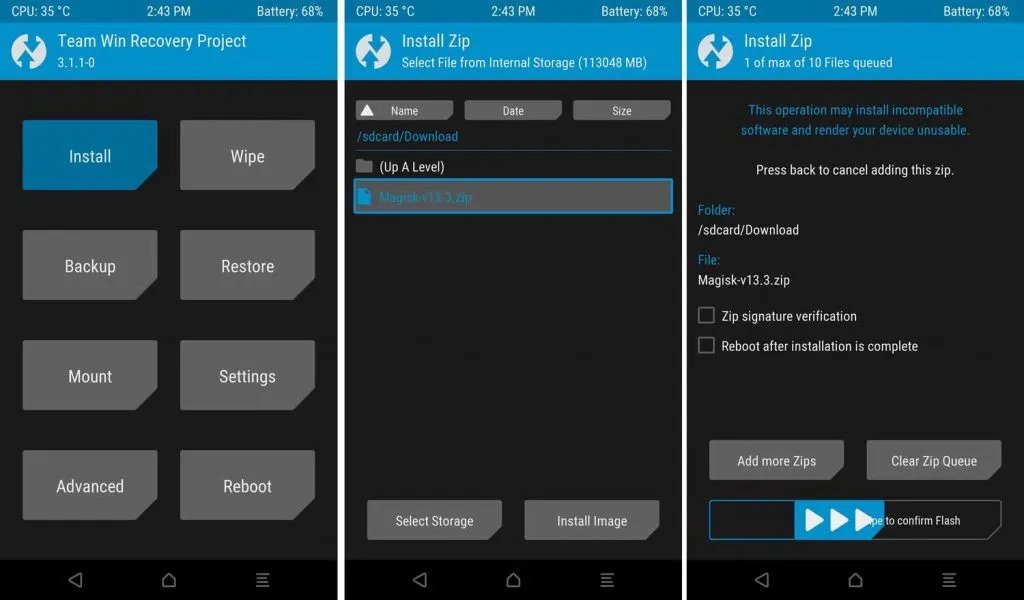
Root Redmi Note 10 Pro Max By Magisk: METHOD 1
Success Rate: 99%
Download the Magisk Zip file and save it to your phone’s internal storage.
Now Boot Redmi Note 10 Pro Max into Recovery Mode by pressing the VolumeUp + Power Button at the same time.
Once you are in TWRP Recovery, Go to Install → Select the Magisk Zip file → Swipe to Install.
Wait till the flashing process completes.
After that, Reboot your device.
That’s it your Redmi Note 10 Pro Max has been Rooted successfully.
Once your device boots up, you will see the Magisk Manager app in the apps menu. This app is very convenient for managing root permissions, install modules, update the app, and much more.
RELATED – How to Install Custom ROM on Redmi Note 10, Pro Max. (Custom ROM File May Or May Not Be available as per the development)
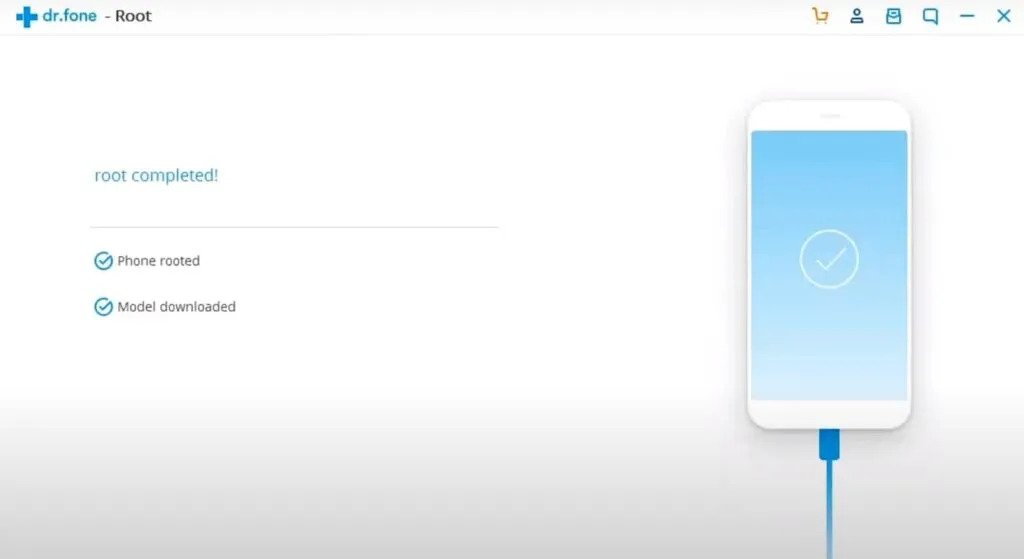
Connect Redmi Note 10 Pro Max via original cable to PC.
Make sure you have a good Internet Connection.
Once your phone gets detected, click on “Root Now.”
Wait till the process gets completed.
Congratulations, You have successfully Rooted Redmi Note 10 Pro Max.
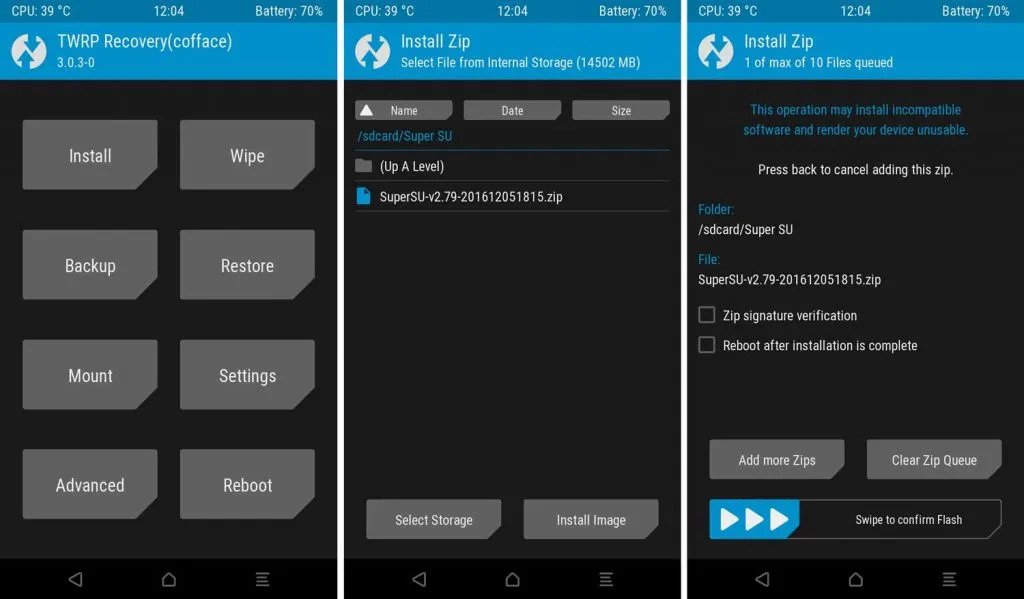
Root Redmi Note 10 Pro Max By SuperSU: METHOD 3
Success Rate: 95%
The method is the most used Rooting method. For this method, we need TWRP Recovery or any Custom Recovery installed on your Redmi Note 10 Pro Max smartphone.
First, download SuperSU Zip and save it to your Redmi Note 10 Pro Max internal storage.
Power off your phone and boot into Recovery Mode by pressing Volume Up Button + Power Button at the same time.
TWRP homepage will be shown on the screen.
Go to Install → Select the SuperSU Zip File → Swipe to Install.
Once done, Reboot your phone.
Well Done! You have successfully Rooted Redmi Note 10 Pro Max.
After your phone Reboots, you will see the SuperSU app on your apps menu. With the help of the superuser app, you can remove Root access anytime you want.

![How To Root Vivo X70 Pro? [6 Easy Methods To Root]](https://www.infofuge.com/wp-content/uploads/2021/10/Vivo-X70-Pro-Plus-500x500-1-150x150.png "How To Root Vivo X70 Pro? [6 Easy Methods To Root]")
![How To Root Samsung Galaxy A21? [6 Easy Methods To Root]](https://www.infofuge.com/wp-content/uploads/2021/10/Samsung-Galaxy-A21-150x150.jpg "How To Root Samsung Galaxy A21? [6 Easy Methods To Root]")
![How To Root Samsung Galaxy M12? [6 Easy Methods To Root]](https://www.infofuge.com/wp-content/uploads/2021/10/in-galaxy-m12-m127-sm-m127gzbgins-405433497-1-150x150.jpg "How To Root Samsung Galaxy M12? [6 Easy Methods To Root]")
![How To Root Oppo A55? [6 Easy Methods To Root]](https://www.infofuge.com/wp-content/uploads/2021/10/Oppo-A55-460x460-5-150x150.jpg "How To Root Oppo A55? [6 Easy Methods To Root]")
![How To Root Xiaomi 11T Pro? [With 6 Easy Methods]](https://www.infofuge.com/wp-content/uploads/2021/10/Xiaomi11TPro-2-150x150.jpg "How To Root Xiaomi 11T Pro? [With 6 Easy Methods]")
![How To Root Huawei Nova 9 Pro? [With 6 Easy Methods]](https://www.infofuge.com/wp-content/uploads/2021/10/huawei-nova-9-1-150x150.jpg "How To Root Huawei Nova 9 Pro? [With 6 Easy Methods]")
![How To Root Huawei Mate 30 Pro? [6 Ultra Easy Methods]](https://www.infofuge.com/wp-content/uploads/2021/11/huawei_mate_30_pro-1024x768-2-150x150.jpg "How To Root Huawei Mate 30 Pro? [6 Ultra Easy Methods]")