So you have rooted your Vivo V20 SE and want your device unrooted back. Don’t worry we will show you the complete steps to unroot your Vivo V20 SE, you can follow one of the five methods listed below.
About Vivo V20 SE
The smartphone comes in a dimension of 161 x 74.1 x 7.8 mm and weighs 171 grams. It supports Dual SIM (Nano-SIM, dual stand-by) and the resolution of the display is 1080 x 2400 pixels.
It is packed with 8 GB RAM with 128 GB internal storage. The smartphone is powered by Qualcomm SDM665 Snapdragon 665 Octa-core processor. Vivo V20 SE runs on the Android 10 + Funtouch 11 operating system.
It is fueled with a non-removable Li-Po 4100 mAh battery + Fast charging 33W,
After rooting the smartphone your phone can become unstable, you may face some issues such as performance errors, lagging, banking not working, and some other issues. You can fix such issues by simply unrooting the device.
Read:
How To Root Vivo V20 SE?
List of The Best Custom ROM available for Vivo V20 SE
Advantages of Rooting your Android phone
Once you root your device there are some amazing things that unlock within your phone. It’s like giving your phone some kind of a superpower to perform anything it desires. There is some kind of desire which made you think of rooting your handset and it must be listed below.
1. Installing Custom ROMs: You can start installing a custom ROM or Kernel. it is the main reason why people try to root their Android smartphones. They are typically more enhanced than our stock ROM or the ROM provided by our phone’s manufacturer. Custom ROMs offer several performance fixes, a good user interface, and several customization tweaks to your system.
2. Ad-block for all apps is now possible: Pop-ups are considered a regular problem in most games and apps, but no one on the stock ROM is taking care of them. It often gets very complicated to stop all kinds of ads on our smartphone whereas on a rooted device it is very easy.
3. Easily install any app: Installing incompatible apps is now possible, root gives access to all the apps you can find. You get several bonuses such as updating the OS before it launches in the market. Also, there are some apps that can’t be uninstalled easily but with root, you can easily uninstall any app on your Vivo V20 SE.
4. More battery life and speed: You get more battery life Greenify to close useless applications automatically, effectively improving your device performance. The app needs root permission to unlock so rooting Android helps the smartphone to unlock its full potential.
6. Create full backups: Apps like Titanium will entirely back up your rooted device. The app only works on rooted Android devices.
Advantages of Unrooting the device
Once you Unroot your Vivo V20 SE, you can start using Banking Apps.
The warranty of your phone will be back
All the Google Apps will start working without any issue.
You can now receive OTA Updates.
Pre-requisites
Make sure your Android device has a good Internet connection.
Fully charge your phone.
Some methods require a PC, so you must have a PC / Laptop with you.
Use only the original USB cable to connect your phone to the PC.
This guide is only for the Vivo V20 SE smartphone. So please don’t try these methods on other android phones.
Warning: The Unrooting process is almost the same for every smartphone. So all the tutorials/ guides shown in this blog are not tested for each and every smartphone.
Infofuge.com is not responsible for loss and damage to your smartphone. Try these methods at your own risk!
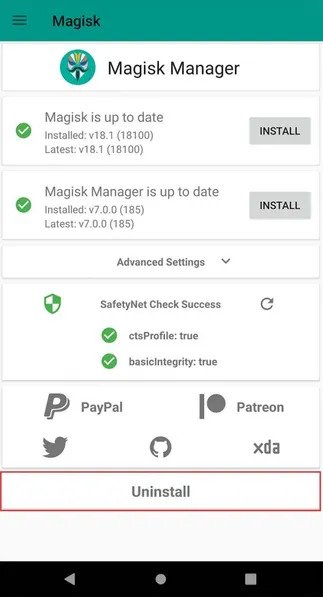
Unroot Vivo V20 SE By Magisk: METHOD 1
First, make sure you are connected to the internet.


![How To Unroot Samsung Galaxy M51? [5 Easy Methods to Unroot]](https://www.infofuge.com/wp-content/uploads/2021/10/images-_1_-150x150.jpg "How To Unroot Samsung Galaxy M51? [5 Easy Methods to Unroot]")
![How To Install Stock ROM in Vivo V20 SE? [2 Easy Methods]](https://www.infofuge.com/wp-content/uploads/2021/10/unnamed-1-1-150x150.jpg "How To Install Stock ROM in Vivo V20 SE? [2 Easy Methods]")
![How To Root Vivo V20 SE? [6 Easy Methods]](https://www.infofuge.com/wp-content/uploads/2021/10/unnamed-1-150x150.jpg "How To Root Vivo V20 SE? [6 Easy Methods]")
![How To Unroot Samsung Galaxy A21? [5 Easy Methods]](https://www.infofuge.com/wp-content/uploads/2021/10/Samsung-Galaxy-A21-1-150x150.jpg "How To Unroot Samsung Galaxy A21? [5 Easy Methods]")
![How To Unroot Samsung Galaxy M12? [5 Easy Methods]](https://www.infofuge.com/wp-content/uploads/2021/10/in-galaxy-m12-m127-sm-m127gzbgins-405433497-1-150x150.jpg "How To Unroot Samsung Galaxy M12? [5 Easy Methods]")
![How To Unroot Samsung Galaxy F22? [5 Easy Methods]](https://www.infofuge.com/wp-content/uploads/2021/10/f22-header-3-150x150.jpg "How To Unroot Samsung Galaxy F22? [5 Easy Methods]")
![How To Unroot Redmi Note 10 Pro Max? [5 Easy Methods]](https://www.infofuge.com/wp-content/uploads/2021/10/xiaomi-redmi-note-10-150x150.jpg "How To Unroot Redmi Note 10 Pro Max? [5 Easy Methods]")