Here is How To Install TWRP Recovery on the Android? Read this guide and you will be able to flash TWRP on your device.
If you want to flash any Custom ROM, Modules, Zip files on your Android phone, then you will need recovery software such as TWRP. The reason why TWRP stands out for recovery is it’s because of its simplicity, broad support, and easy-to-use UI. Please keep in mind that if you perform anything wrong in this guide there are chances that your phone will brick.
What is TWRP Recovery?
TWRP or TeamWin Recovery Project is a great way to dig inside your android phone. The recovery environment is the place where your phone uses to install Android updates, restore itself to factory settings, and perform some other tasks. This TWRP project can help you to create backups, install ROMs, root your phone, and a lot more stuff.
Advantages of installing TWRP Recovery on your Android Phone
Easily Root your Phone
You can Hard Reset or Wipe your smartphone after installing TWRP Recovery
Create and Restore Android backups easily
Format/Clean or Repair broken partitions easily
You can install ZIP files or Install Custom ROM on your phone.
You can update Android OTA updates manually your phone to the latest Android OS
Manufacturers don’t want you to install OS other than provided by them. So they provide very limited resources so that you cannot use any other software images. Recovery software like TWRP is useful for flashing Custom ROMs on your device. Since you have bought this Android device and as an advanced user you are free to do anything with your phone.
Disadvantages of installing TWRP Recovery on your Phone
The warranty of your device gets void.
Your phone can get bricked if you install any wrong or unstable image, so make sure you are using the correct ROM for your specific device.
You may face some performance issues after installing TWRP.
Flashing an Unstable ROM to an Android can make your phone unfunctional.
You will not get any OTA updates from your device manufacturer.
Prerequisite
Download the TWRP Recovery IMG file to your PC and Rename it to TWRP.img.
Make sure to Unlock Bootloader On an Android Smartphone.
Take a complete backup of your Android. It will help you to restore files if anything goes wrong.
This method is only for the Android smartphone. Please do not try this method on any other smartphone. Otherwise, it will Brick your phone.
Steps To Install TWRP Recovery on Android Phone
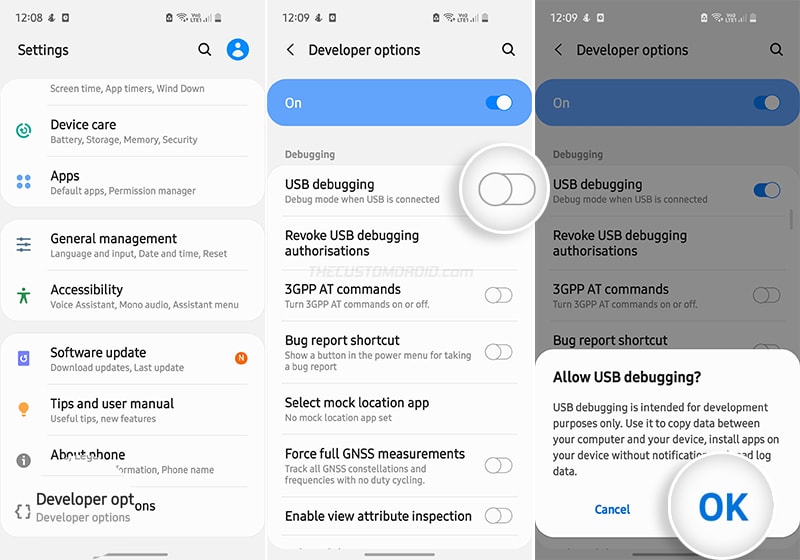
1. First Enable USB Debugging on your Android phone. Go to Setting → About → Software → Build Number and tap for 6-7 times till developer options are not enabled on your phone.
2. After that, Go Back to Settings Tab and Go to Developer Options → to enable the USB Debugging option.
3. Once done now you need to Set Up ADB and Fastboot on your Windows or PC. Follow the steps shown below.
4. Connect Your Android to your PC via your USB Cable.
5. Open the ADB folder located in this location C:\adb.
6. Move TWRP.img file to ADB Folder.
7. Now open CMD by typing “cmd” on Address Bar and Hit Enter as shown in the screenshot below.
8. Once done on the Command Window type the following commands.
adb reboot bootloader
Hit Enter, this command will Reboot your Android smartphone to Download Mode.
9. Once done, connect your Android Smartphone to your PC/Laptop via the original USB cable.
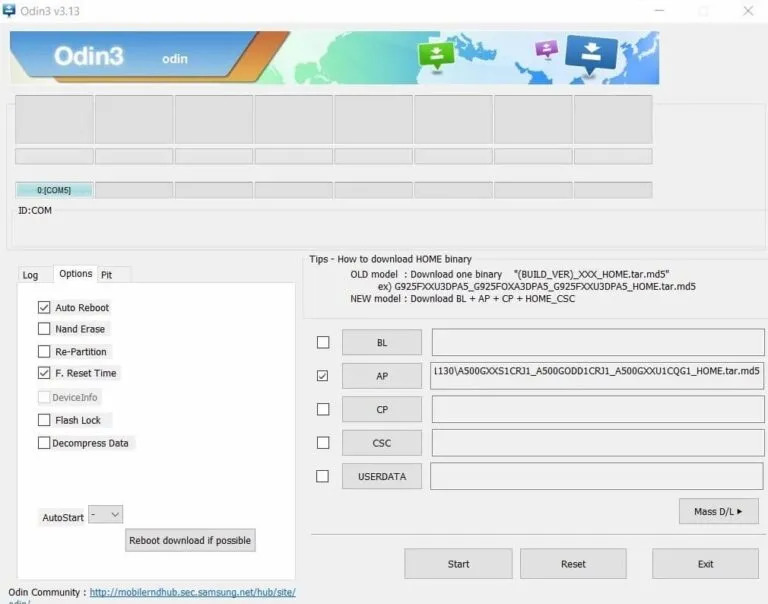
10. Now on your PC extract the Odin file to your desktop.
11. Open the extracted folder and run the Odin.exe file.
12. Click on the AP Tab option and select the TWRP recovery file. (Again make sure that the recovery is a .tar file, or else it may cause some problems.)
13. Go to options and uncheck the Auto Reboot option.
14. Now Tap on the Start button and wait for a few minutes.
15. Once completed, you see the PASS message on the Odin screen.
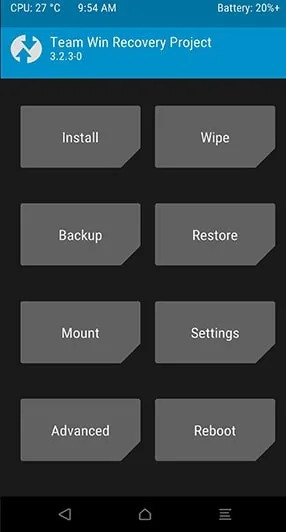
16. TWRP recovery is successfully flashed on your Android.
You can now Boot your Phone into TWRP Recovery by pressing & holding the “Home + Power + Volume Up” button until you see the Samsung logo on the screen, release all the buttons and your device will boot into TWRP Recovery Mode.
Conclusion
So you have successfully installed the TWRP recovery software on your device. This is How you can install TWRP on your Android phone.
You can easily flash any file on your device by going into recovery mode by pressing the keys’ combination.
Now you can get extra features from your devices such as flashing Stock ROM on your Android smartphone, creating a backup, wiping cache, and much more.
If you have encountered any queries during the process provided above feel free to comment down below.


![How To Soft Reset Android Smartphones? [Complete Guide]](https://scache.vzw.com/kb/images/samsung/smg950_955uzvs/device_power_vol_dn.jpg "How To Soft Reset Android Smartphones? [Complete Guide]")

![How To Install TWRP Recovery in OnePlus Nord? [Flash TWRP Easily]](https://www.infofuge.com/wp-content/uploads/2021/10/71g4nfB3QL._SL1500_-150x150.jpg "How To Install TWRP Recovery in OnePlus Nord? [Flash TWRP Easily]")
![How To Install TWRP Recovery in Vivo V20 SE? [Flash TWRP Easily]](https://www.infofuge.com/wp-content/uploads/2021/10/unnamed-2-150x150.jpg "How To Install TWRP Recovery in Vivo V20 SE? [Flash TWRP Easily]")
![How To Install TWRP Recovery in Samsung Galaxy S21? [Flash TWRP]](https://www.infofuge.com/wp-content/uploads/2021/10/Gear-galaxys21_plus_phantom_silver_front-150x150.jpg "How To Install TWRP Recovery in Samsung Galaxy S21? [Flash TWRP]")
![How To Install TWRP Recovery in Samsung Galaxy A22? [Flash TWRP]](https://www.infofuge.com/wp-content/uploads/2021/10/4_zu_3_Samsung_Galaxy_A22_5G-2-150x150.jpg "How To Install TWRP Recovery in Samsung Galaxy A22? [Flash TWRP]")